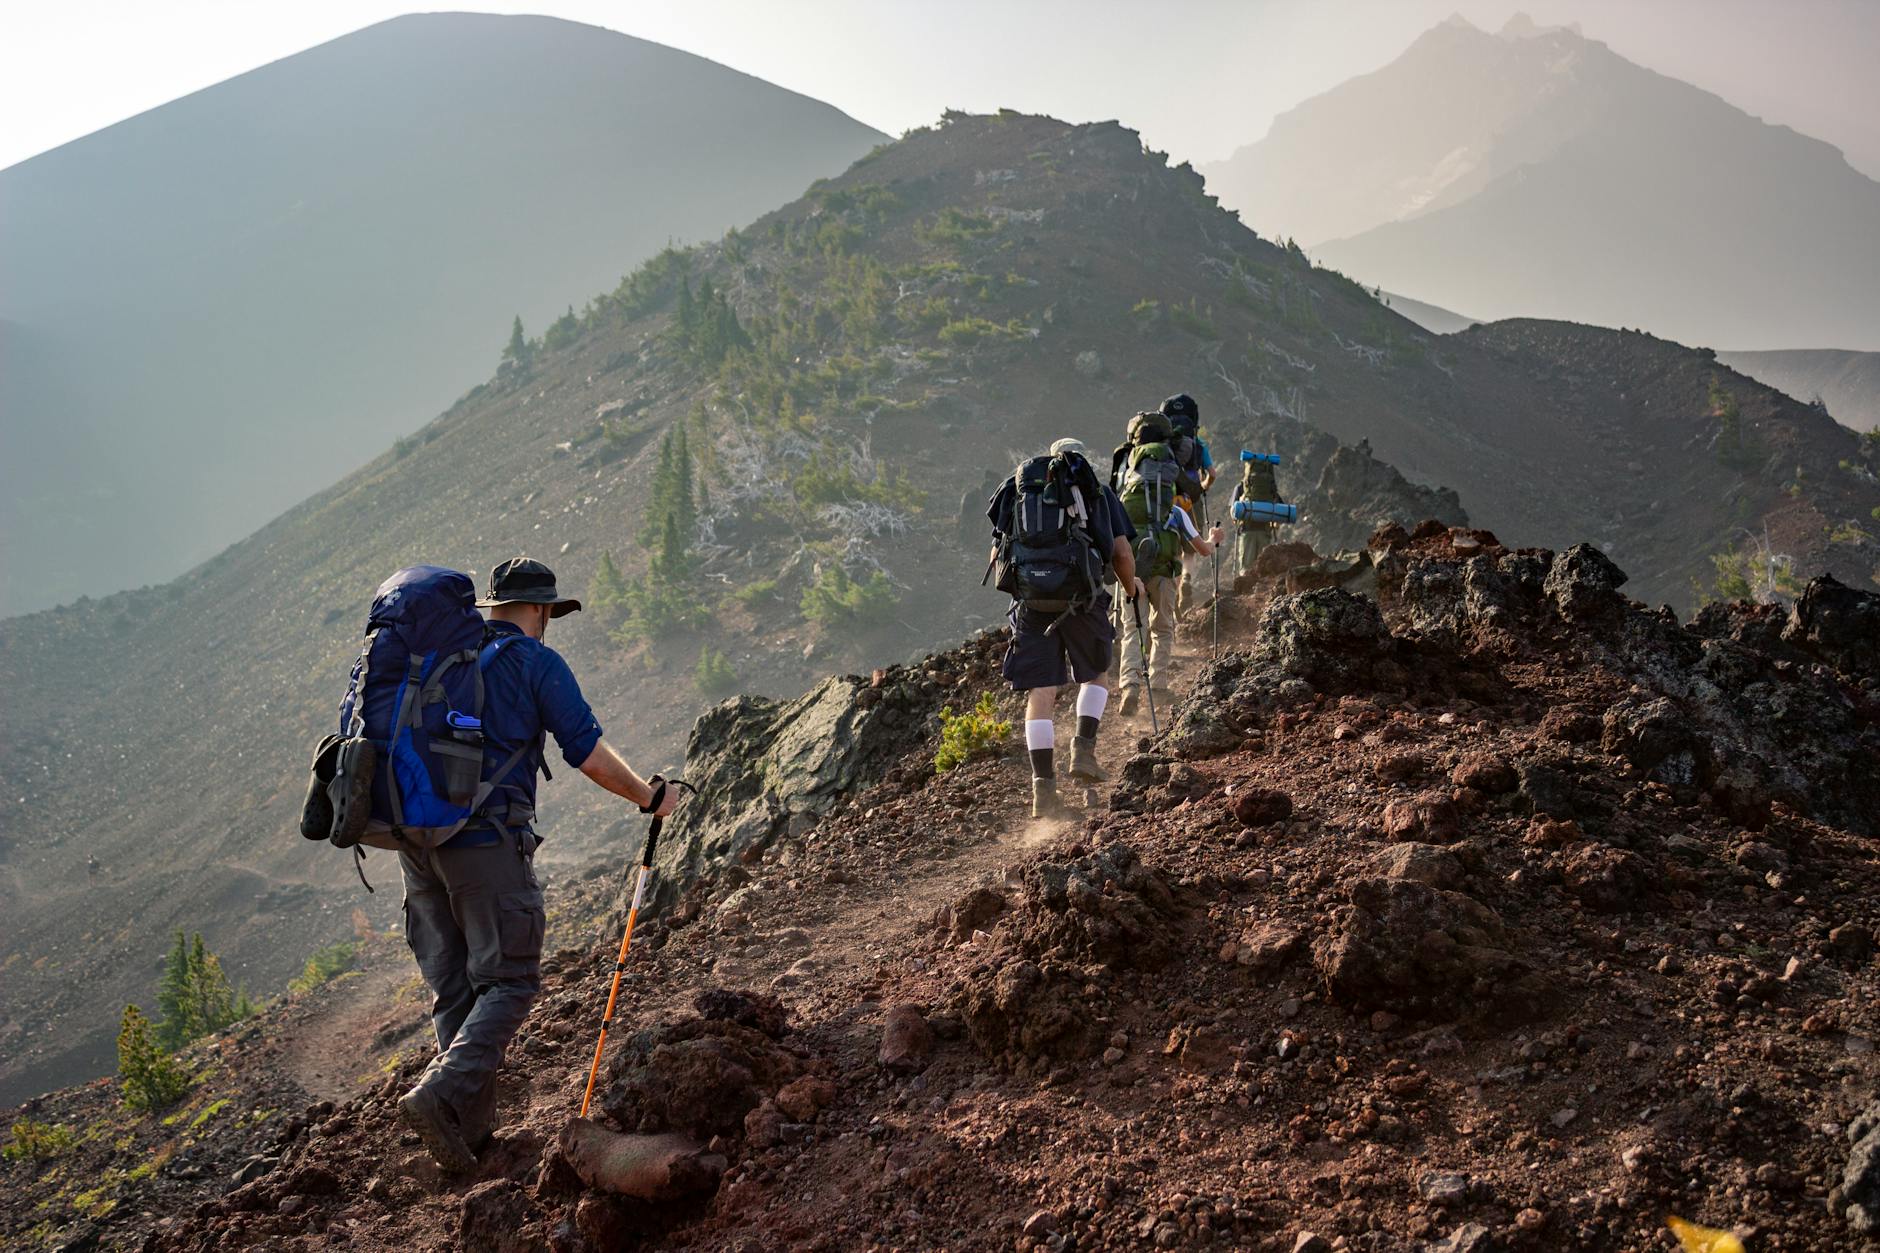
OK, we normally do day hikes or short camping trips, but we’ve never done a long five-day hike from 4-5km up (yes, that’s 16,000 feet in altitude). learned a lot about what it takes to get up there, and here are some tips if you are similarly inclined, but here are the big lessons.
Listen to the pros on packing lists
Two of our number had summited Mt. Everest, and the list can seem a little ridiculous, but pay attention to it. I can’t tell you how glad I was to have a “pee bottle” (yes, it is what it sounds like) because when it is -2C outside, you don’t want to get up and go outside. I did that first night, and it was cold.
Learn how to hike with ½ the Oxygen
This seems kind of silly, but there is such a difference between hiking at sea level and even hiking at 2000 meters (which can be a little dizzying) is nothing like even a gentle slope at 4,500 meters. The hypoxico chart is pretty stark, but basically because there is less pressure, there is basically half the oxygen per breath at 16,000 feet vs sea level. Makes me really admire all the folks who have been up way high.
| Altitude (ft) | Altitude (m) | % Oxygen | Location |
|---|---|---|---|
| 0 – Sea Level | 0 – Sea Level | 20.9% | Hypoxico HQ, NY |
| 1,000 | 305 | 20.1% | Tbilisi, Georgia |
| 2,000 | 610 | 19.4% | Canberra, Australia |
| 3,000 | 914 | 18.6% | Chamonix, France |
| 4,000 | 1219 | 17.9% | Salt Lake City, UT |
| 5,000 | 1524 | 17.3% | Boulder, CO |
| 6,000 | 1829 | 16.6% | Stanley, ID |
| 7,000 | 2134 | 16% | Flagstaff, AZ |
| 8,000 | 2438 | 15.4% | Aspen, CO |
| 9,000 | 2743 | 14.8% | Bogota, Colombia |
| 10,000 | 3048 | 14.3% | Leadville, CO |
| 11,000 | 3353 | 13.7% | Cusco, Peru |
| 12,000 | 3658 | 13.2% | La Paz, Bolivia |
| 13,000 | 3962 | 12.7% | Yabuk, Sikkim |
| 14,000 | 4267 | 12.3% | Pikes Peak, CO |
| 15,000 | 4572 | 11.8% | Mount Rainier |
| 16,000 | 4877 | 11.4% | Mount Kenya |
| 29,000 | 8839 | 6.9% | Mount Everest |
Calvin said that you can simulate this with high temperature and wearing a mask, but I can tell you that it is not quite the same; your conditioning is going to have to be really good to make it up there. So take the training regime seriously, and yes, finding altitude is good. I was shocked by how simple slopes caused me to just gasp.
There are high altitude tents and things around the world, and it’s not crazy to jump into one and see how it goes.
Using Poles and Technique like a Quadraped on your Quads
On the other hand, thanks to Pasquale, I did learn a lot about how to be more efficient while hiking. This isn’t about mountaineering, it’s about just, well, walking:
- The first thing is that I was dragging myself up the hill with my trekking poles. Instead, shorten them a lot (I went from 120mm to 105mm), and here’s the rhythm.
- When your left foot goes forward, the right pole should end up parallel to it. You should really be balanced on one leg at a time, so when going forward, the right foot is pushing backwards (as is the left pole).
- Then you repeat this, so you can think of yourself as a quadraped, the opposite side pole acts just like your foot. The forward foot is compressed and pushing you up, while the rear foot and the rear poll and pushing backwards.
- The idea is to lengthen your stride. Note that this is going to put a lot of pressure on your quads, so you need weight training isn’t stupid; doing squats and things will help get those stronger.
- At the end of a long day, a lot of the guys were burning out their quads, that is they were at the lactate threshold, but see the next note on breathing
Breathing in time through your mouth, in time with your steps
I really had a hard time breathing up there, with roughly half the oxygen, it just feels like you are not getting enough oxygen (duh!). The trick here is to time your breathing with your walking, so you want to inhale on the step out and exhale on the step over. Also, I found that it’s really essential to become a mouth breather (ok, I take this to the excess), but a life of cycling and martial arts teaches you that breathing from the abdomen is super effective, you need to get that blood.
The other interesting thing is the timing of breathing. Since I cycle a lot, this is not that important, just work hard to get as much air in as possible, but with hiking, it is much easier if you breathe in on the step forward and exhale on the push. Amazingly this really helps. Thanks Pascale!
Heart rate at 85, blood oxygen at 80, even with Altitude meds
Listen to your travel doctor, the regret factor is high, but yellow fever and rabies aren’t the greatest things to try to survive, so loading yourself up with the right vaccines. The most controversial is altitude medications. The biggest reason people come off the mountain is High Altitude sickness. Believe me, you don’t want to get HAPE (your lungs fill with fluid) or HACE (your brain does the same).
What was really shocking was to see how much altitude affects your heart rate. My heart rate at altitude went to 85, and my lactate threshold is around 140, so that means instead of going from 55 to 140 with all that extra energy, I literally had half the “burst” capacity.
It was helpful for the nerd in me to have my Apple Watch (but see the next section on gadgets), it was definitely not helpful to have to charge it so much. A Garmin is probably going to work better on these long jaunts, as they last two weeks, but still, it was useful to know your real-time blood oxygen levels. Or be depressed by them.
Altitude meds, Sleeping Bag Ratings, and the “pee” bottle
OK, this is a little gross, but because these altitude meds are a diuretic, I found that I was up every 90-120 minutes at night needing to go to the bathroom. This really impacts your sleep pattern, and recovery is really hard at altitude. So, staying warm in -2-4C, which I have to get all the time, is really hard. The trick, of course, is to stay warm in your tent and ideally in your bag when you have to go. This requires some real gymnastics that I’ll leave to the reader’s imagination.
The biggest thing I discovered is my trusty North Face Sub-Kilo bag, which is rated at 0C does not actually mean that you will be warm and toasty when it is 0 °C. In fact, I nearly froze my feet to death at that temperature. Instead, this rating is really the minimum “survivable” temperature. Fortunately, the outfitter had a -20C bag, which I wrapped around my bag, but really, figure out the lower temperature you will encounter and bring a bag that is literally rated at 20C lower than it.
Also, remember that warming up at night is really hard, so make sure that you:
- Don’t wear wet clothes; this is going to make it even harder to get warm. These places are really cold with low humidity
- Don’t wear a lot of clothes; you should have maybe some socks and long underwear, because these bags are designed to be next to the skin and heat.
- If your feet are chilled, this sounds crazy, but just lifting your feet straight up while in the bag will get them warm
- And yes, if you are lucky enough, you can come to love a Nalgene with hot water in it to keep you warm (if you have the fuel to do that).
Going slower within your limits
The most important thing I found on a long 5-day journey like this was the classic: if you are below your lactate threshold, you can go on for days. I tried to manage this carefully, but it was frustrating and hard. Instead of working at a sedate 110 bpm, which is normal when we are in the Canadian Rockies at 2kM, instead I was running at 120-130 bpm.
The good news is that by slowing down (which is hugely embarrassing to be the last in line), you can keep below your lactate threshold. By doing that, I found that a little self-massage of the quads was enough, so I didn’t get that long-term soreness, which is kind of amazing. Slow and steady does win the race.
Clothing Notes: Carry it all and an Umbrella too!
The temperatures are hugely variable that high up, so the packing list literally had:
- Down jacket
- Light raincoat
- Heavy raincoat
- Vinyl Rain pants
- Removable leg hiking pants
- Ex Officio shirt
- Synthetic undershirt
- Synthetic underwear
- Umbrella
- Trail runners
- Medium hikers
- Gumboots
- Light gloves
- Waterproof gloves
And we used every piece of that gear, stripping down to shorts and then back up to the full gear each day. You might ask about the Umbrella. Well, this is at the equator, and it was the rainy season, and you learn that Gore-Tex lasts about an hour in heavy rain, vinyl lasts about two, so we were subject to a four-hour massive downpour, and life without an umbrella is pretty awful. Also, the Wellingtons sound silly until you realize you end up hiking in a foot of mud in some cases, and certainly a stream (which is what a trail becomes a literal stream).
Shoes: Salomon Speed Cross 6 and Bogs II
Also, make sure you’ve hiked and these are broken in. I’m mainly glad the weather held, and I was able to get away with the Salomon Speed Cross 6 trail runners ($145 on Amazon). The ground is really rough and wet, and has a low weight (weight on your feet is the worst, and you don’t have much aerobic capacity). The version I have isn’t waterproof, but I coated it. If you can get the water-resistant ones, I would. That 11 oz shoe vs say a 1Kg one definitely helped me a lot.
Finally, when you are hiking out, I got a pair of Bogs II ($150 at REI), which were pretty spectacular. I ended up donating them to the local guides, but I sure loved them. They were expensive at $150, but in terms of fit and bomb proofness, they were amazing. They do fit a bit tightly, so size up at least a half US size. If you are going to go in the winter, you may need more, but chaffing is the big problem on trips like this, so being snug matters.
On the trail, hydration and nutrition, and don’t try new stuff
One thing that is pretty clear from Mark is that carbohydrate loading is important. Here is where I made a huge mistake. Alex had left a carbohydrate energy mix, but I didn’t try it before the trip. It turns out that this had dairy and soy, so the first day was really painful. The real net of this is that this can really work. I have used Hammerhard HEED for years, but I don’t try a new drink ever! There are lots of these drinks out there, but the new Hammer Perpeteum sounds good (Amazon) as does Tailwind or Skratch.
But some other favorites are Honey Stinger Energy Chews for chews and Nuun, which provide electrolytes (but not carbohydrates).
Then there are bars and chews. Clif Bars are also good, but make sure they don’t have caffeine or milk, or nuts if you are allergic to those things. Personally we use Lara Bars alot because they are so simple and not too sweet ($11 for 12 at Amazon)
But since I didn’t have it, I did find that just plain water helped a lot. A lot of my buddies didn’t have any water after four hours; it’s hard for me to imagine that.
Electronics and charging: Solar power, breaking USB connectors and power banks, plus Apple Watches
This is where I had the most problems, there were three of which the most important was that my only powerbank broke and so did my only USB C cable:
- My main power bank’s USB C output literally cracked and split. The temperatures are low, so the main lesson here is that it is better to bring two 10KmAH batteires than one.
- Also it broke inside my only USB C cable, so the lesson here is cables are light, just double up on them
- With a five day trip, you can use alot of power, so having a Solar powered system isn’t such a bad idea. The Flex Solar 10 seems like a good choice, it hangs on the back of your pack as you are walking ($32 Amazon). It has a USB A output. The Blavor is more convenient but you can’t really use it while hiking, so best if you have a set camp or lots of sunlight. ($23 Amazon)
- Make sure you have a collection of USB A to C and C to USB A connectors as well.
The second issue is what heart rate monitors and watches should you bring:
- Watches (tl;dr get a Garmin Enduro 3 or a fixed Forerunner 970). My Apple Watch Ultra I just upgrade to WatchOS 26.0 and it had terrible battery problems. It would literally burn through an entire battery in five hours. When I got home moving to 26.0.2 solved this problem and it went back to the more usual, but it meant that I was constantly out of juice. That’s because I only had a single USB C port (see above) and it died. The long term solution here is to go to a Garmin Watch because it has a two week battery life. And having to worry all the time sucks. So I’m probably going to recommend that a Garmin is perfect for long hiking trips, the Apple Watch has more features. But the Garmin Forerunner 965 has a nice screen and still will last 24 hours in endurance sports on GPS. The Garmin Enduro 3 looks like a great value choice and the battery lasts forever with 120 hours on GPS. The DC Rainmaker has a good update for the latest version bumps because they have four lines, the Forerunner 970 ($749), the Venu X1 ($799) the Enduro 3 ($799) and the Fenix 8 ($999) Here are the differences, the Venu X1 is a Apple Watch competitor so it has a huge 2″ screen and just two days of battery life, so I wouldn’t consider it. The Forerunner 970 has a much brighter screen so it only lasts 29 hours. While the Fenix 8 is less bright and the Enduro 3 is a cutdown Fenix 8 without a speaker or diving guages and its “only $800”. Practically, the Enduro/Fenix gets 4-6 days of usages while the Forerunner 970 gets 2-3 days (because of the brighter display). This is one reason to get the Forerunner 965 since it uses the older and less power hungry display that the Enduro 3 has.
- Heart rate monitor. Because the Apple Watch Ultra has such terrible battery life, I run it in low power mode and then use a Polar Heart Rate monitor as a supplement. This really isn’t that ideal as it’s another device and it probably makes more sense to just get an Enduro 3 (I’m sure they will update it to the new AMOLED at some point, but hopefully it will continue to have great battery life).
- iPhone. I was actually surprised how well the battery life worked here. If you leave it in low battery mode and airplane mode and turn off the always on display it can last an entire day. Because I lost my battery I also turned it off unless I wanted to take pictures which was really inconvenient, but did work. Having that backup 10mAH Power bank was great with Qi Charging
- Power Bank. This is where I got screwed. I brought a single three in one charger, but when my USB C cable broke I couldn’t use it. In retrospect, I would probably just have two complete Anker charging sets so this wouldn’t be a problem. Actually, with the Qi Charger above, I would just need an extra Apple Watch charger (or a Garmin charger). Also Anker Qi Charger I discovered has USB C input and then onliy a USB A output so it would not power a USB C 3-in-1 that needs PD. Argh! Note that some of these power banks come with included cables, I wouldn’t do this, instead use a Magnetic contact system, so you don’t put wear on the plugs themselves. And if the magnetics fail, you can use the underlying port.
- Power adapters. Because the trip in the car is long, bring a 12V Car to USB C and a power adapter too so you can be topped up. We had a 4 hour drive to the drop off point and I could have really used it.
- Airpod Pros and Eyeshades. I’m so glad I actually brought these. It would seem that it is so quiet you wouldn’t need it, but believe me when you are sitting there worried about tomorrow a relaxing book tape can really help. The same with eyeshades, they were really a lifesaver
So here is the net conclusion:
- For short hikes, the Apple Watch Ultra is fine, but for multiday like this, get a Garmin Enduro 3 or something that lasts a long time (then you don’t need to worry or need a heart rate monitor).
- Get two complete charging systems (I had two but one broke and the other couldn’t), but I think you need a USB Power bank that has 10KmAH (ok that’s 10AH, but who is counting) that supports USB C in and out. And you should get two of these. Then you need a 3-in-1 charger pair and at least two USB C cable sets. Some examples would include th Anker Prime 26,250mAH 3-port. This is a massive batter but it has two USB C ports both of which you can charge and discharge, so if you break one like I did, you can still use the other one. It’s the biggest battery allowed on airplanes and it can push out 140W per USB C port which is pretty crazy (and expensive at $170). There are actually not that many power banks anymore that don’t have integrated cables and othes like the Anker Prime 9600mAH also has two USB C inputs and it includes a charger as well but you can’t charge from the USB C ports. Others like the INIU 140W Power Bank 27000mAH has only a single input charging port so is vulnerable to that port getting destroyed.
- Get a set of Magnetic Adapters so the cables never are really plugged in to avoid catastrophic failure. I’ve been using these for a while
- Get a set of LED cables so you can make sure you are drawing power
Eyewear: Photochromatics Rock, the JUlbo Ultimates
Well, Will had the ultimately cool new smart glasses with a camera in the middle which I really loved, but most hiking feature bright sunlight then the dark. I found that my Julbo were just excellent for this. There are bunch of models from the Density on and I can’t quite remember the exact model I have, but if you take good care of them they are awesome. On the site, they look like the Ultimates ($244, but I remember I got them just before the pandemic on clearance for $110!). They are nice because you can swap the frames and the lenses as well and for Asian noses, the nose clips are bendable.
They are photochromatic from levels 0-5 or so so just about perfect for most conditions. The technical term if VLT (Visible Light Transmission) which can go from 0% to 100% (pitch black). These are Reative 1-3 which is 13-73% and just about right. I actually wore them in the pitch dark on an early monring ascent and you hardly noticed them.
I also brought a set of really dark “sunnies” as well but found I really didn’t need them that much in Kenya. Even though it was super bright when the sun was out, the clouds were so variable. These things are also superlight and not that durable so you have to be careful. But on the other hand, you can forget you are wearing them.
Also when there is wind and you have contacts, you really need that amoung of protection. Some other alternatives include the Ruby Project Rydon. I also have a heavier set of Smith Photochromatics, but they are pretty heavy so I didn’t bring them.
Headlamps: Brighter is better and bring extra batteries
This is so embarassing, but I had a nice headlamp set and it worked fine. The problem is Alkaline batteries will work and then when cold, they just stop working. So that is what happened. The net is I couldn’t find my backup batteries and got some from someone else. The lesson is remember where you put your batteries.
As for the headlamp itself, I learned a few things, around camp it doesn’t matter too much and it is very useful to have a red light this is so you don’t blow your night vision but when you are climbing and used to it, you really want a headlamp that has a variable “throw”. So that you can expand it to a broad beam when in a group and not be so disoriented.
The weight doesn’t matter that much. I didn’t bring my ultra bring 2170 system, but I kind of wish I did, because when you are disoriented, more light really helps. So next time I would really recommend a high power light. And really you should have a backup headlamp as when its dark its a problem.
I love the reviews at 1lumen.com and they are very precise about light throw etc:
- Armytek Wizard C2 PRO MAX. I personally love these rechargeable models with 2170 batteries because there’s no waste and they are BRIGHT. The name is kind of ridiculous, but great views
- Olight Perun 2 review. This is what you need for hiking, it’s got huge throw which as I said is great for noobs. (Olight 3 is or Olight for $90 on Amazon but quality is worth it)


